The global script variables feature allows the definition of variables which can be accessed from any script operating on the FRED document. After a global variable has been defined in the document, any script can access and modify the variable without the need for a Dim statement within the script. A common usage of the global script variables would be for adding model parameterization by using an embedded script to modify the model construction based on the values entered in global array variables. Another example would be for storing array data that can be accessed by scripted materials during the raytrace in order to represent spatially varying refractive index values.
This feature can be accessed by selecting Tools > Edit/View Global Script Variables from the menu.
GUI Functionality A special interface is implemented for the Array type global script variables that allows limited capability for editing and viewing array values. The GUI allows full editing for 1-D and 2-D arrays by clicking on the Edit/View button for the array variable. For 3D or larger arrays, the Edit/View interface cannot be used to view the array data and modification of the variable will need to be performed via scripting. Within the Edit/View array interface, the columns are labeled with letters and the rows are labeled with numbers. The array can be resized by right mouse clicking in the interface, selecting "Resize" and then setting the desired number of rows and columns for the array.
Array Indexing Direct indexing of a global script array (i.e. g_array(0,1) ) will only work for arrays up to two dimensions due to limitations in the control which accesses the global arrays. Attempting to directly index a global script array variable with 3 or more dimensions will result in an error message, "Wrong number of parameters". Rather than directly indexing the global script array variable itself, copy the global array variable to a temporary (local) variable, perform modifications/retrieval from the local variable and then reassign the local variable to the global array variable when finished. The code below demonstrates how to create a 3 dimensional array, initialize the values and assign it to an existing global array variable, g_array: Dim tmp(1,1,1) As Long tmp(0,0,0) = 0 tmp(0,1,0) = 1 tmp(1,0,0) = 2 tmp(1,1,0) = 3 tmp(0,0,1) = 4 tmp(0,1,1) = 5 tmp(1,0,1) = 6 tmp(1,1,1) = 7 g_array = tmp
Re-Dimensioning Global Arrays The BASIC ReDim command can normally be used with array variables to change the size of the array and may be combined with the Preserve keyword to extend the array while keeping the existing values. The ReDim command cannot be used with global script variables. To re-dimension a global array variable: 1. Copy the global array to a local array variable. 2. Re-dimension the local array variable and assign the values. 3. Copy the local array variable back into the global array variable.
An example of this procedure is provided below, with g_array being the global array variable: Dim tmp tmp = g_array ReDim tmp(1,1,1) tmp(0,0,0) = 0 tmp(0,1,0) = 1 tmp(1,0,0) = 2 tmp(1,1,0) = 3 tmp(0,0,1) = 4 tmp(0,1,1) = 5 tmp(1,0,1) = 6 tmp(1,1,1) = 7 g_array = tmp
Listing Array Contents The script below demonstrates how to print the contents of a 1D, 2D or 3D global array variable to the output window. Sub Main
ClearOutputWindow()
Dim gVar As Long gVar = FindGlobalVar( "g_array" ) PrintGlobalArrayInfo( gVar )
End Sub
Sub PrintGlobalArrayInfo( ByVal in_var As Long)
Dim tmpArray As Variant tmpArray = GetGlobalVarValue( in_var )
Print "" Print "==========" Print "Global Array Variable Info:"
'Get the number of dimensions in the array Dim maxDim As Long maxDim = GetArrayBoundsErrorChecked( tmpArray ) Print "Max Dimensions " & Chr(9) & maxDim
'Case of an array with 4 dimensions or more If maxDim > 3 Then Print "Array dimensions larger than 3. Will not be printed to output window." End End If
'Case of a 3D dataset Dim curDim As Long If maxDim = 3 Then For curDim = 0 To UBound(g_array,2) PrintArray3DSliceData( tmpArray, curDim ) Next End If
'Case of a 2D dataset If maxDim = 2 Then PrintArray2DData( tmpArray) End If
'Case of a 1D array If maxDim = 1 Then Print "Array data" For curDim = 0 To UBound(tmpArray,1) Print tmpArray(curDim) Next End If
End Sub
Sub PrintArray2DData( ByVal in_array As Variant )
'This subroutine prints the contents of a 2D array
Print "Array data "
Dim curRow As Long, curCol As Long For curRow = 0 To UBound( in_array,1 ) For curCol = 0 To UBound( in_array,2 ) Print in_array(curRow,curCol); Next Print "" Next
End Sub
Sub PrintArray3DSliceData( ByVal in_array As Variant, _ ByVal in_dim As Long )
'This subroutine prints a single slice of a 3D array
Print "Data for dimension " & in_dim
Dim curRow As Long, curCol As Long For curRow = 0 To UBound( in_array,1 ) For curCol = 0 To UBound( in_array,2 ) Print in_array(curRow, curCol, in_dim); Next Print "" Next
End Sub
Function GetArrayBoundsErrorChecked( ByVal in_array As Variant) As Long
'Returns a count of the number of dimensions in an array. Upon triggering 'an error condition, the function clears the error and returns the dimension value.
On Error GoTo errCatch
Dim boundCount As Long boundCount = 1
While True UBound( in_array, boundCount ) boundCount = boundCount + 1 Wend
errCatch: Err.Clear Return boundCount-1
End Function
The variable list can be modified by right mouse clicking and selecting one of the appropriate options:
•Insert Row - inserts a row before the currently selected row •Delete Highlighted Rows - deletes the row (or rows, if you selected more than one) that are selected •Reinitialize Highlighted Rows - changes the Current Value of the highlighted rows to the Initial Value for each variable (does not apply to array type variables)
Row Selection: Rows can be selected by mouse clicking on the row number (first column) of the row to be selected. A contiguous set of rows can be selected by clicking on the row number of the starting row, then holding the Shift key and clicking on the row number of the last row to be selected. A non-contiguous set of rows can be selected by holding the Control key and clicking on the row numbers of the rows to be selected.
Row Re-ordering: The variable list can be reorganized by clicking and holding on the row number and dragging it up or down to another place in the listing. A red line will appear at the position where the row will be re-inserted into the list.
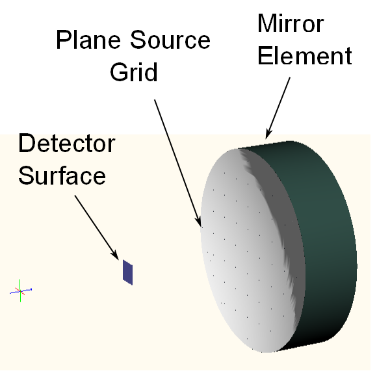
Pre/Post-Update script example The following example shows a common use of the pre/post update scripts with the global script variables in order to facilitate automatic re-positioning of geometries. In this example the system is a plane wave source incident on a parabolic mirror being focused to a detector. When set up properly we can use the global script variables dialog to control the radius of curvature (ROC) of the mirror surface, a pre-update script to set the ROC and re-position the detector plane at focus, and a post-update script to perform a new raytrace. With this in mind the implementation steps are:
1. Create a global script variable to control the ROC 2. Create/Activate a pre-update script a. Set the new mirror ROC b. Set the new detector position 3. Create/Activate a post-update script to perform a new raytrace
The following image shows the system layout.
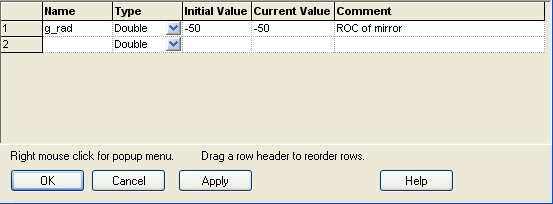
First, the global script variables are defined. In this case we will only control the mirror ROC and allow the pre-update script to correct the detector position. The global script variables dialog is shown below:
Now that the global script variable is defined, we can implement the pre-update script routine shown below (Menu > Tools > Edit/View Pre-Update Script). The steps of this script are: (a) retrieve the mirror parameters using T_ENTITY and T_MIRROR, (b) set the mirror curvature (1/ROC) using the global script variable, (c) retrieve the detector surface z-shift using T_OPERATION, and (d) set the detector z-shift to be the nominal focus position of the parabolic mirror.
Sub Main( ) Dim op As T_OPERATION Dim ent As T_ENTITY Dim mirr As T_MIRROR Dim mirrNode As Long, detNode As Long
ClearOutputWindow
'(a) Get mirror information mirrNode = FindName( "Test Mirror" ) GetMirror mirrNode, ent, mirr
'(b) Set mirror ROC from global script variable mirr.param1 = 1/g_rad SetMirror mirrNode, ent, mirr
Print "Mirror ROC: " & 1/mirr.param1
'(c) Get detector information detNode = FindName( "Detector" ) GetOperation detNode, 1, op
'(d) Set detector shift information op.val3 = g_rad/2 SetOperation detNode, 1, op
Print "Relative detector position: " & op.val3
End Sub
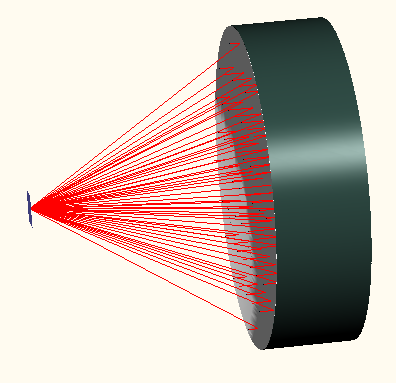
The final step is to implement a basic post-update script to perform a raytrace with the re-positioned detector plane and updated mirror ROC. The post update script is a simple TraceCreateDraw statement.
At the end of the post-update script we should find that the detector plane has been automatically re-positioned at the correct focus as shown below.
|
||||||||||||||||||||||||||||||